





Arena Setup
Whack Me arenas are configured through the interactive menu opened with /wm edit <arena>. This guide follows the entire workflow from creation to a playable, registered arena.
Step 1: Create the Arena
Section titled “Step 1: Create the Arena”📸 Preview: Creating an arena
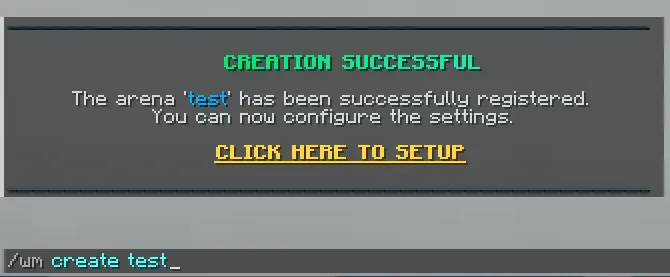
Create a new arena with a unique, stable ID:
/wm create <arena_id>Use IDs such as arcade_1 or castle_whack. The ID is reused by join commands, placeholders, setup output, and saved data.
Step 2: Open the Setup Menu
Section titled “Step 2: Open the Setup Menu”📸 Watch: Opening the setup menu


/wm edit <arena_id>The home page provides access to locations, portal layout editing, point-block settings, music, display toggles, arena records, signs, and final registration.
Step 3: Set Start and End Locations
Section titled “Step 3: Set Start and End Locations”📸 Watch: Configuring arena locations

Open Manage Arena Locations (FILLED_MAP). Both locations are required.
Start Location
Section titled “Start Location”- Click: Saves your exact position. In the normal layout mode, you must already be surrounded by end portal frames.
- Shift-click: Centers the saved position on the current block and automatically places end portal frames in the eight surrounding positions.
When the plugin detects the surrounding frame ring, those eight blocks become the arena’s portal locations automatically.
End Location
Section titled “End Location”- Click: Saves your exact position.
- Shift-click: Centers the position on the current block.
The end location is used after normal finishes, leaves, kicks, cancellations, and reconnect recovery.
Step 4: Define the Portal Layout
Section titled “Step 4: Define the Portal Layout”📸 Watch: Building a custom portal layout

Portal locations are the positions from which point blocks rise. Use the automatic eight-frame ring from the start-location action, or click Manage Portal Layout (ENDER_PEARL) to build a custom layout.
In Portal Editing Mode:
- Your inventory is saved and replaced with end portal frames plus a barrier.
- Place frames to add point-block positions.
- Break frames to remove positions.
- Use the barrier to leave editing mode, save the new list, and restore your inventory.
Step 5: Open Point-Block Settings
Section titled “Step 5: Open Point-Block Settings”📸 Watch: Opening and navigating point-block settings

The Point Block Settings entry unlocks after portal locations exist. It opens a dialog with arena-specific spawning, movement, and appearance controls.
| Setting | Default | Allowed range | Purpose |
|---|---|---|---|
| Minimum active blocks | 4 | 1 to portal count | Lowest target number of simultaneously visible blocks. |
| Maximum active blocks | 8 | 1 to portal count | Hard cap on simultaneously visible blocks. |
| Vertical movement step | 0.05 | 0.01 to 0.20 | Distance moved per tick; higher is faster. |
| Maximum vertical step | 0.64 | 0.01 to 1.00 | Safety cap applied to the movement step. |
| Peak wait | 12 ticks | 0 to 40 | Time the block waits at its highest point. |
| Spawn check period | 8 ticks | 1 to 20 | Delay between checks that replace missing point blocks. |
| Asynchronous movement | Disabled | On or off | Moves point-block animation outside the main thread; cleanup remains synchronous. |
Step 6: Set Active Block Amounts
Section titled “Step 6: Set Active Block Amounts”📸 Watch: Adjusting minimum and maximum point blocks
Choose Active Block Limits to edit the minimum and maximum together. Both are capped by the number of portal locations. If the maximum is set below the minimum, Whack Me raises it to match; changing either value individually also keeps the pair valid.
Customize Block Appearance Optional
Section titled “Customize Block Appearance ”Use Customize Point Block Looks to assign the green, red, and gray hit-state items. Put an item on your cursor and click the corresponding preview slot. Blocks, player heads, and custom item metadata are supported, and the saved stack amount is normalized to one.
Step 7: Select Arena Music Optional
Section titled “Step 7: Select Arena Music ”📸 Watch: Selecting and previewing a song

If NoteBlockAPI is installed, Select Arena Music lists every valid .nbs file in /plugins/WhackMe/musics/.
- Left-click: Select the song for this arena.
- Right-click: Preview the song for yourself.
- No Song: Clear the arena’s selection.
Whack Me includes five starter songs and repeats the selected song while a player occupies the arena. See NoteBlockAPI Music for installation and custom files.
Step 8: Configure Other Settings Optional
Section titled “Step 8: Configure Other Settings ”📸 Watch: Toggling arena display settings

The Other Arena Settings page controls two independent per-arena options:
- Arena Scoreboard: Enables the live scoreboard for this arena. The global
scoreboard-enabledoption must also be enabled. - Arena Boss Bar: Enables the configured timer-progress boss bar for this arena.
bossbar.ymlmust also haveenabled: true.
Changes apply immediately if that arena currently has a running game.
Step 9: Reset an Arena Record Optional
Section titled “Step 9: Reset an Arena Record ”📸 Watch: Resetting an arena record safely

After an arena has a record, Reset Arena Record shows its holder and score. The confirmation page prevents accidental deletion. Confirming resets only that arena’s global holder to None and score to 0; it does not erase player statistics or personal records.
Step 10: Create a Join Sign Optional
Section titled “Step 10: Create a Join Sign ”📸 Watch: Linking a join sign

Place a sign, look directly at it, and click Create Arena Sign (OAK_SIGN). Whack Me registers, formats, and waxes the sign. Its state updates automatically, and players can right-click it to join.
Breaking a registered sign requires whackme.sign.break. See signs.yml to customize the four lines and state labels.
Step 11: Register the Arena
Section titled “Step 11: Register the Arena”Click Register the Arena (FIREWORK) when setup is complete. Whack Me verifies these required values in order:
- Start location
- End location
- At least one portal location
If a value is missing, registration stops and names the missing option. On success, the arena becomes ready, starts its waiting runtime, and the success message includes a clickable /wm join <arena> action.
Joining the Game
Section titled “Joining the Game”Players can now start a run in either way:
/wm join <arena_id>- Right-click the registered arena sign
An arena accepts one player at a time. If occupied, other players must use another arena or wait until the run finishes.
Setup Menu Summary
Section titled “Setup Menu Summary”| Item | Name | Function |
|---|---|---|
FILLED_MAP | Manage Arena Locations | Set the required start and end points. |
ENDER_PEARL / ENDER_EYE | Manage Portal Layout | Enter or leave the custom portal-frame editor. |
LIME_TERRACOTTA | Point Block Settings | Configure amounts, animation, spawn checks, and appearances. |
MUSIC_DISC_BLOCKS | Select Arena Music | Select, preview, or clear an NBS song. |
BOOK | Other Arena Settings | Toggle the scoreboard and boss bar for this arena. |
PLAYER_HEAD | Reset Arena Record | Clear this arena’s global holder and score after confirmation. |
OAK_SIGN | Create Arena Sign | Link the sign being viewed to the arena. |
FIREWORK | Register the Arena | Validate and activate the arena. |